[Tutorial 教學] 上色 Coloring
遲了很多的上色教學終於要來了!第一次做教學,在畫的時候常忘了要截圖。雖然頗麻煩,不過也很有趣,以後應該也會做的。
The coloring tutorial is here now! This is the first time to make tutorial, always forgot to take screen capture. The process was so troublesome but also interesting. I may make more tutorial in future.
這次作教材的是這幅……
This time I'd like to use this drawing for my tutorial……
pixiv: http://www.pixiv.net/member_illust.php?mode=medium&illust_id=39648434
テーマ:放課後のゆりゆりタイム
主題:放學後的百合百合時間
Theme: Yuri-Yuri time After School
本來應該由兩位主持百合和靜來做教學的,但這幾天實在畫不了,所以就以文字來說明吧!
Originally here should be arranged by two poster girls Yuri and Shizuka, but I really can't draw these days, so I'll use words this time!
☆軟件 Software: Paint Tool SAI
在上色教學之前,先來說一下 ACG 的插畫的步驟吧!
Before the coloring tutorial, let's talk about the steps of drawing an ACG illustration!
| 1。想像 Imagination | → | 2。初稿 First Draft | → |
3。第二草稿 Second Draft | → | 4。線稿 Line Art | → |
| 5。基本色 Base Color | → | 6。光影 Lighting and Shading | → |
| 7。效果 Effects | → | 8。最後修正 Final Adjustment | → |
基本就是以上的八個步驟,當然在一些如厚塗的作法下,第3、4步是多餘的。每個步驟都有其意義和作用,例如第1到第2步,就是把無形的東西具體化出來的步驟,第2步的初稿可以是除作者外沒人會理解的東西,當想像就強烈的話,從第1直接跳到第3也是常見的,但通常都會輕輕的帶過第2步初稿來讓想像定形在紙上的。
Basically this 8 steps to draw a ACG illustration. Of course step 3 & 4 will be skipped when doing a impasto. There is significance and role for every steps. Step 1 to 2 is to realize the invisible imagination. First draft in step 2 is always incomprehensible except the drawer. There are some cases that the step 2 will be skipped when the imagination is very strong, however professional will always glossed over step 2 but not skip for modeling the idea on paper.
相關的東西以後有機會再說,先回到這次的上色教學吧。
I'll talk these topics in future, let's back to current tutorial.
☆步驟 Step 4. - 線稿 Line Art
在上色前,應該已經去到 Step 4 線稿了。線稿的做法有兩種,一種是黑線,一種是付色線,小弟是後者。付色線的處理方法有兩種,第一種是先黑線,隨後轉色,第二種是一開始就畫付色線,小弟是後者。新手請先用黑線,對顏色未在行但想用付色線的朋友,可以先畫黑線隨後才轉色。
Before coloring, there should be a line art now. There are two line art, one is black line, other is colored line, and mine is colored line. There are 2 methods to handle colored line, one is black first color later, other is color at first, and mine is color at first. Newbies please use black line first. For drawers who are not familiar of coloring but want to use colored line, you may use black line first then change color later.
這是付色的線稿,請把這個圖層設成『色彩增值』。
This is colored line art, please set this layer to "Multiply".
☆步驟 Step 5. - 基本色 Base Color
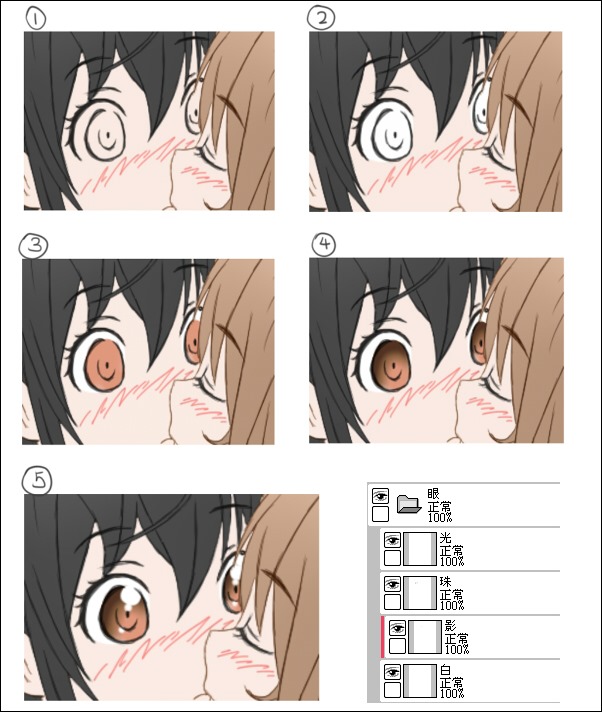
使用魔棒、選擇筆和擦,把不同區域地方選起來,用基本色填充(Ctrl + F)。記住要為每個區域分圖層。
Use wizard, select pen and rub to select area, then fill in the basic color (Ctrl + F). Don't forget to create different layer for every area.
About the eyes, can be colored here, or colored later. I'd preferred to finish the eyes here, so let me share here.
先上眼白,再上眼珠的基本色,眼珠的陰影,最後就是光位。
Firstly paint whites, then the base color, shading, finally lighting.
就這樣當成完成基本色也可以,不過再做些功夫會更好,但相對要求比較高了。
Base Color can be finished at this moment, but doing much more will be better, of course much higher skill is needed.
為每個色塊都輕輕地做一下漸層,只要輕微的程度就可以,不用很誇張。
Make a color gradient for every color layer. Remember not to make so heavy.
然後就是臉頰,不要忘了耳朵也會紅的啊。程度就看個人喜愛了,小弟最後用了2的程度。
Then make the cheek, don't forget the ears. Level is up to you. I finally use no 2.
就這樣,步驟5的基本色完成。
To here, Step 5 Base Color is completed.
☆步驟 Step 6. - 光影 Lighting and Shading
常說光影光影,一般都是先做影的,所以先說一下如何加上影子吧。
Usually we do shading then lighting, so I'd share the way to do shading.
以肌膚為例,先新增一個圖層於肌圖層之上,設定成色彩增值和剪裁遮色片,然後就用肌膚的色或灰階色彩把陰影塗上。
For example, add a layer on top or skin, set to Multiply and Clipping Masks. Then use the skin color or gray level color to paint the shadow area.
用同一手法把其他的圖層都打上陰影,這樣光影的影就完成了。
Use the same method to make shadow to other layer, then shading is finished.
由於之前在基本色時已做了一次漸層色,如非有強列光源的話,可以不用加光位。頭髮的光位就看個人喜好,小弟這次並沒有為頭髮加光。
Because I'd made color gradient, if there is no strong light source, so no lighting is need. You may add lighting for hair, I don't make it this time.
☆步驟 Step 7. - 效果 Effects
這次構圖很簡單,所以也沒有甚麼效果要加上去,要做的就只有兩件事,背景以及加強層次感。
Because this is so simple, no effects is needed. Only 2 things I should make, one is background and other is strengthen sense of hierarchy.
首先是加強層次感,只要第二草稿做得好,這個步驟將會變得很簡單!
Firstly strengthen sense of hierarchy. This can be easily to finish if you have a good second draft!
先為第二草稿做一個複本,然後用模糊筆刷把草稿模糊掉。
First make a copy of second draft, then use Blur Pen to blur it.
把處理好的圖層移到人物圖層之上,設定覆蓋,就會發現效果了!如不想影響背景,可以設成剪裁遮色片。
Move the blurred layer to the top of character layer and set to "Lay Over", then you will see the effects! If don't want to make effect to background, set it as a Clipping Masks.
接著就是背景。由於是白合作,而且是嘴嘴作,所以不用選擇,粉紅就很自然了!
Then make the background. Because this is a Yuri illust, PINK is a must!
☆步驟 Step 8. - 最後修正 Final Adjustment
最後修正非常重要,所有專業的插畫師都會在發佈自己的作品前細心地檢查作品的每個小地方,絕不馬虎!
It's very important to do the final adjustment. All professional illustrator will check every minor area before posting, must not sloppy!
先為人物和背景的圖層資料夾做複本,然後合併。
Make a copy of layer folder of character and background, then merge them.
直接在合併後的圖層上做修正,然後就大功告成了!
Directly make adjustment on the merged layers, then the great work is made!
本次上色教學就到此結束!這段時間會開始準備聖誕主題和四格漫畫,希望各位多多支持!
Coloring Tutorial is completed. I'm beginning to prepare X'mas Theme and 4-frame Comics, please keep supporting me in future!


留言